Molds for plastic injection are made of two pieces, one with a negative shape of the top of the part to be molded, the other with a negative of the bottom. Once closed, the cavity is pressure-filled with molten plastic and a part is obtained. For small parts a mold may allow the simultaneous casting of several units - similar or different. The plastic may be injected from one or from several points in the periphery of the mold and is chanelled to each cavity. Some 10 seconds later the parts are cold enough to be solid and the mold opens to allow their removal. As the mold closes again, the cycle is complete.
The parts are connected to a matrix made up of a plastic shape of the chanels. Each part must now be cut free of this matrix but a small burr will result.
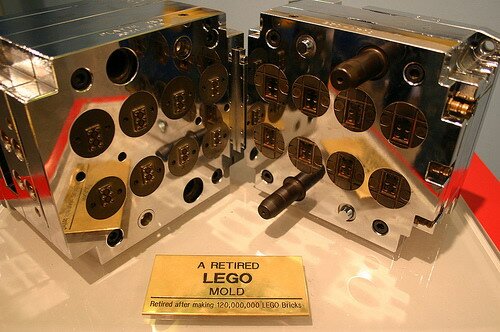
The illustration below, reproduced from a LEGO® image, shows a mold of the 2X4 brick. It will be noticed that in this case each cycle produces 8 bricks.
An important point is that molds are cut from steel and are hardened after machining which usually renders unprofitable any later alteration. For that reason, even when small carving alterations (like the addition of a logo) are needed, new molds have to be made.

Although several parts are produced in each cycle of operation, they are not exactly identical. Each cavity was originally machined separately and has small burrs that will be reproduced in the parts, somewhat as a gun barrow imprints bullets. However, manufacturers need a faster way to identify mold cavities producing defective parts (because of wear or the accumulation of residues) so that they may be intervened. And so, when a mold is used to cast replicates, each cavity is often individually identified with a number.
The earliest LEGO parts were not identified as to the mold used. But by the mid 1950s the new molds produced had each unit identified by a number. The first use of this system that I could find in my limited stock of early material was in the 2X4 early brick. Each cavity was inscribed by hand with a number and if you look carefully under a brick that looks flat, you will notice when you tilt it against a light that a number can be seen. This number was scratched with a sharp point on to the mold.
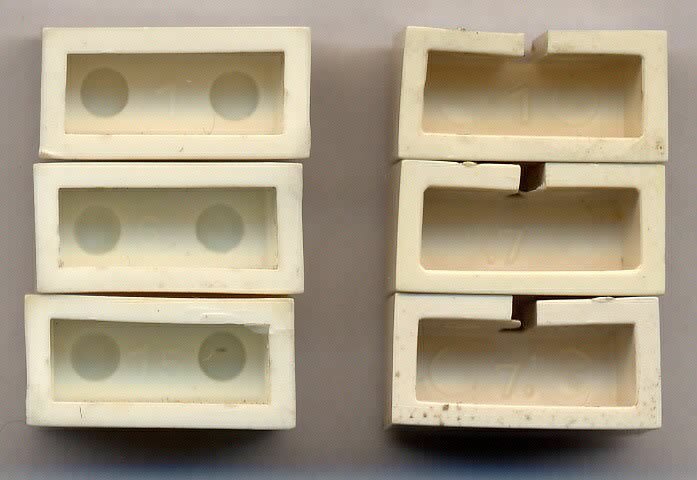
All molds made after circa 1954/1955 have their units identified by a number or, in some of the earliest molds so produced, a number and one or two dots differently positioned (see figure below).
Since molds did wear in a few years time (tipically one to four years, depending on the mold alloy and on the rate of production) the numbers in a brick, associated to other characteristics, may help date a single brick. But, note, there are a few irregularities: unumbered bricks, replicated numbers, and numbers inscribed over others. These may result from production at multiple factories, mistakes at the time of production of the mold, later corrections and other causes. But problematic discrepancies are seldom met with in the early bricks of Danish origin that will be the subject of our study.

The 1X2 bricks on the left side illustrate the numbering system used in most cases from circa 1954/55 up to, at least the early 1960s. The "6" and "9" have dots at the base to tell both apart.
On the right side, a numbering system briefly used in the 1X2 bricks in the mid fifties. Here the individual molding units are identified by a system using both numbers and dots differently positioned around the numerals.